Having sound but no picture on your Sony TV is frustrating, but usually an easy fix. This guide walks you through all the common causes and proven solutions to get your picture back. After 12 years servicing TVs, I’ve fixed this issue hundreds of times on Sony Bravia, Android and Google TV models.
By following these steps in order, you’ll save hours of guesswork and avoid unnecessary costs.
- Power cycling fixes most cases - unplug for 60 seconds and hold the power button for 30 seconds to clear firmware glitches
- HDMI connections cause 30%+ of video loss - reseating cables and testing alternate ports isolates the problem fast
- Source device misconfiguration mimics TV failure - verify external devices are powered on and set to the correct output resolution
- Factory reset clears corrupted software - use Settings > Storage & Reset before assuming hardware failure
- Service Mode exists for deeper diagnosis - Sony TVs have built-in hardware diagnostics accessible via remote button sequences
#What Causes Sound With No Picture on Sony TVs?
There are several potential root causes for loss of video with continuing audio:
Software Glitches
Like any complex device, Sony TVs can experience sporadic firmware hiccups causing video output failure while sound remains unaffected.
Power cycling typically resolves this by rebooting the operating system.
Loose HDMI Connections
Poor cable contacts or slightly dislodged ports interrupt video transmission through the HDMI input while preserving audio signal.
Carefully reseating cables often fixes this. Trying other ports helps determine if the issue is cable or port related.
Power or Setup Issues
If source devices like DVD players aren’t powered on or configured correctly, the TV receives only the audio signal or outputs a ‘No Input’ screen rather than video.
Failed Components
Rarely a component like the T-Con board fails resulting in intact sound but no video. Troubleshooting helps identify if replacement is warranted.
If your TV also has a blinking red light, that points to a specific hardware error code worth checking separately.
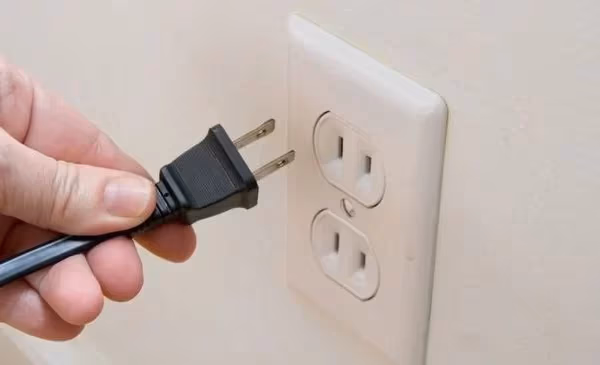
#Power Cycle Your Sony TV
The absolute first thing you should do if your Sony TV has sound but no picture is power cycle it.
Here are the simple steps:
-
Unplug TV – Disconnect the power cord from the wall outlet.
-
Wait 1 Minute – Set a timer for one full minute before reconnecting power. This allows capacitors to discharge completely.
-
Press Power Button – After unplugging from the wall, press and hold the power button on the TV itself for 30 straight seconds. This drains any residual energy from associated circuitry.
-
Reconnect and Power On – Plug the power cord back into the wall outlet and power on your TV using the remote control.
The vast majority of the time, power cycling resolves glitches caused by the TV’s integrated software and firmware. Any temporary operating failures self-correct when you reboot the system.
That said, there can still be physical connection or hardware problems preventing video display. So if a power cycle alone doesn’t do the trick, methodically move on to inspecting cable connections.
#Check Your HDMI Connections
Assuming a power cycle alone didn’t restore your picture, poorly mated HDMI connections are the next most likely culprit.
Carefully completing these troubleshooting steps often reveals the video loss is simply caused by a loose or faulty HDMI cable, bent pins inside a port, or trying to use a bad port altogether. Reseating interfaces almost always does the trick in that case.
#Inspect Cable Integrity
-
Examine along the HDMI’s full length for bent, broken or separated contacts. Any physical cable damage prevents proper signal transmission.
-
Connect the suspect HDMI cable to another TV input AND connect another HDMI cable to the original port. This checks if issue is cable or TV based.
-
Still an issue? Replace cable. Playing musical chairs isolates the problem component.
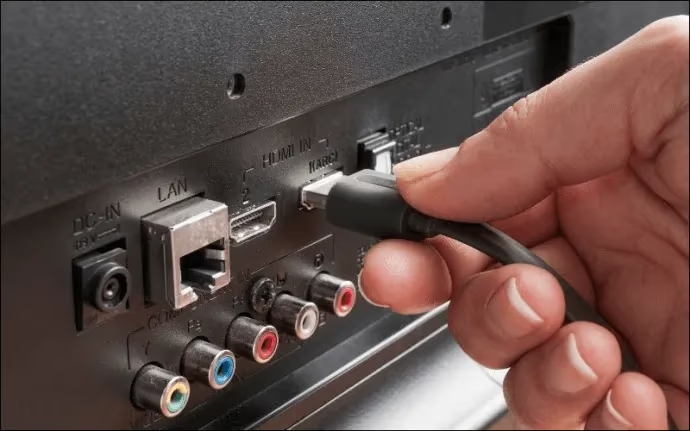
#Reseat HDMI Interfaces
-
Disconnect BOTH ends of HDMI cable then visually inspect inside ports for damaged or dirty pins. Carefully straighten any bent pins with tweezers.
-
Use compressed air to blow out any debris inside the ports then reseat cable ends with gentle but firm pressure to ensure solid mating with the connectors.
Be methodical here by connecting directly into various ports one at a time to pinpoint any bad HDMI inputs.
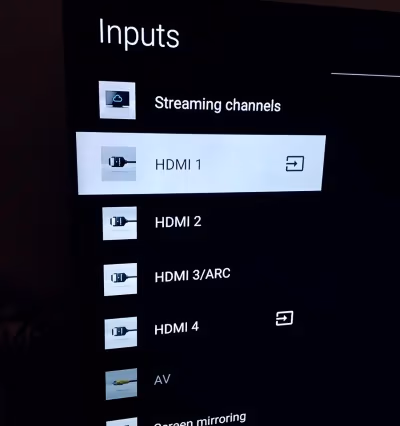
#Change Video Input Source
While diagnosing connections, also toggle through all available video Input sources on your TV with the Source/Input button on your remote.
-
Streaming boxes, consoles and other devices auto-detect HDMI inputs. So ensure you’re viewing the correct interface channel those are now assigned to, easily evidenced by the proper device name popping up on screen when switched to.
-
If HDMI assignments got shuffled inadvertently, that would also result in no video found on prior video source selection.
#Ensure Devices Are Powered On and Set Up Properly
With fresh power cycles, snug connections and input sources double-checked, externally connected devices misconfigured or powered off can also be at fault.
If activating the intended video source only displays a ‘No Signal’ screen, there are a few quick troubleshooting steps to take.
-
Verify Devices Are Powered On – Receiving audio but no picture often means media devices like Blu-ray players have gone to sleep or silently powered off. Physically confirm the power light is lit on each source component.
-
Reconfigure Video Output Settings – Playback devices may have video output modes that are incompatible with your TV. Refer to your device manual to check for proper resolution configurations.
-
Replace Old HDMI Cables – Some legacy source devices don’t reliably mate contacts with modern, higher throughput HDMI cables. Use newer High Speed HDMI cables.
-
Eliminate HDMI Splitters/Switches – Intermediary devices sometimes fail in ways that preserve audio paths while interrupting video signals. Connect your devices directly into TV ports.
Methodically eliminate any points of failure between your media sources and television. Remember audio and video are carried as distinct signals. So receive chains – whether software or hardware based- can absolutely fail in one path but not the other.
#Try Other Video Input Sources
Prove whether or not the core TV has video display capability remaining by connecting alternate source devices using various interface types. This further isolates the fault down to specific ports, cables or connected playback components.
For example, select TV channel inputs via coaxial connections, screen mirror mobile device apps wirelessly or attempt older composite video cables. Similar steps which physically alter the video input path to your TV help determine if any display capability remains versus a failed main board or panel.
If NO video displays from ANY alternate input sources, there may be an underlying hardware failure within the TV itself as covered in the next section.
#How Do You Factory Reset a Sony TV With No Picture?
Thus far solutions have focused on the most likely external variables causing sound without picture. Software glitches or HDMI physical connections tend to be the root cause.
Before getting into internal TV hardware failures, attempting a Factory Data Reset makes sense to clear out any potential corrupted software or firmware still preventing proper video display despite troubleshooting peripherals.
Here is how to hard reset a Sony TV to factory specifications:
-
Power on your TV
-
Navigate to ‘Settings’ and select the option labeled something like ‘Storage & Reset’
-
Highlight ‘Factory Data Reset’
-
Confirm reset when prompted
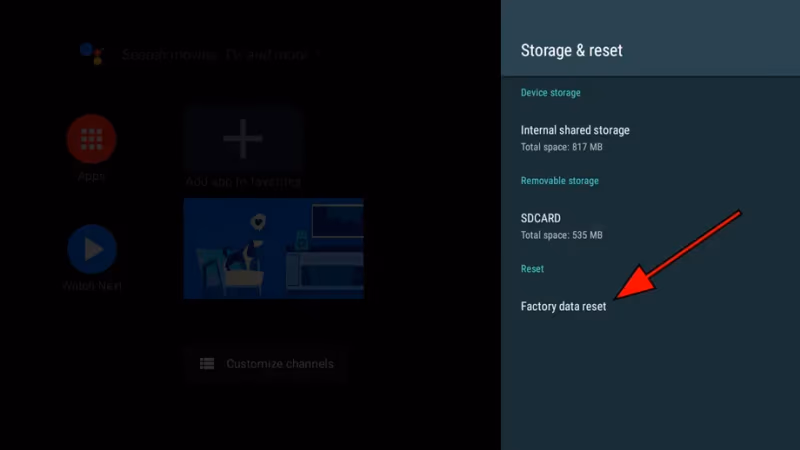
This returns all internal software programming back to Day One out-of-the-box condition. Allow several minutes for the process to fully complete as the TV will automatically cycle power at least once.
Confirm video capability with an alternate device like a Roku or Blu-ray Player after the reset finishes. If display problems persist, there may be a hardware fault needing in-depth diagnosis. Note that a factory reset also fixes issues like Netflix not working on Sony TV or other app-related black screens.
See also this guide on why your Sony TV won’t turn on and how to troubleshoot.
#Enter Service Mode to Diagnose Hardware Issues
At this stage, you have systematically ruled out the most common external culprits preventing video display on your Sony.
-
Software glitches cleared with power cycles and factory reset
-
Poor HDMI connections inspected and securely reseated
-
Alternate video input sources attempted to confirm panel functionality
With proper software operation restored, snug connections at every video handoff and reasonable proof that display components DO actually still work to some degree – that leaves hardware failure within the TV itself as the remaining possibility blinding video.
Sony service manuals detail a precise button sequence on remote controls to activate a special diagnostic and settings state called “Service Mode”.
Similar to entering a hidden phone menu for testing, this grants you deeper access to view diagnostics data and further tweak components. Expertly utilized, these engineering submenus help precisely identify where hardware video processing failures occur.
Some of the key options available:
-
Enable an overlay grid test pattern on the panel for visual inspection
-
Directly test and trigger individual electronic components critical to video processing
-
View detailed ongoing diagnostic status codes from components like the T-Con circuit board
-
Adjust voltages to different elements in precise increments
Without walking through every specific for unlocking and utilizing Service Mode here, the key takeaway is that additional internal troubleshooting is possible BEFORE declaring your entire TV dead and in need of motherboard replacement surgery.
Specialized repair techs use these built-in tools to pinpoint problems down to the microcomponent level where replacement or repair costs are much more affordable.
#Contact Sony Support for Assistance
After exhausting personal troubleshooting capabilities, connecting with Sony Support provides some remaining options before designating your TV deceased.
Escalated technicians can fast track parts replacement approval possibly needed out of warranty. Or further advanced diagnostics steps exist natively in the firmware that only authorized repair centers can activate remotely.
I recommend only seeking manufacturer assistance AFTER reasonably attempting the following key steps yourself:
-
Power cycle TV to clear software glitches
-
Inspect every video connection integrity
-
Verify playback devices configured properly
-
Test additional video input sources
-
Hard factory reset TV software
Armed with completed reports from all preceding troubleshooting, Support can accurately escalate your case for expedited repair or part replacement approval minimizing downtime.
Call Sony TV support directly at: 1-239-245-6354
Hours of Operation:
-
Monday – Friday: 9 AM – 9 PM ET
-
Saturday – Sunday: 10 AM – 8 PM ET
Via chat here.
#FAQ
#Why did my Sony TV suddenly lose picture?
Sudden video loss usually points to a firmware glitch or internal component failure, especially the T-Con board that processes video signals. Power cycling fixes the majority of these cases. If the problem returns after a reboot, inspect your HDMI connections and try a factory reset before assuming hardware failure.
#Can a loose HDMI cable cause sound but no picture?
Yes, this is one of the most common causes. HDMI carries audio and video as separate signals, so a partially seated cable can pass audio while dropping the video feed. Reseat both ends of the cable firmly and test with a different HDMI port to rule out a bad connector.
#How do I fix PS5 no video only audio on a Sony TV?
Disable HDCP mode on your PlayStation console first. This encryption protocol can block video output while still passing audio through. If disabling HDCP restores the picture, there is an HDCP version mismatch between your console and TV.
#What does a blinking red standby light mean on a Sony TV?
Sony TVs use specific blink patterns to signal detected hardware faults. A blinking red standby light typically indicates power regulation problems or a failed internal component. Count the number of blinks in each cycle, then look up that specific error code in your model’s service manual.
#Does factory reset fix sound but no picture on Sony TV?
A factory reset clears corrupted firmware and software settings that may block video output. Navigate to Settings > Storage & Reset > Factory Data Reset while the TV is powered on. This returns the TV to out-of-the-box condition, so you will need to reconfigure your apps and preferences afterward.
#Why does only half my Sony TV screen display?
A vertical line where the picture cuts off usually means failed LEDs or a loose ribbon cable inside the panel. Before assuming you need a full panel replacement, check ribbon cable connections and run Service Mode diagnostics. Loose internal cables account for a surprising number of partial display failures.
#Is it worth replacing the main board on a Sony TV?
For smaller models with accessible internals, a main board swap costs $50-150 in parts and is doable with basic tools. Larger or premium Bravia models are harder to work on and carry more risk of damaging other components during disassembly. Get a repair estimate from Sony Support or a local technician before deciding.
#Bottom Line
Hopefully reviewing the troubleshooting progressions above emphasizes how repairable sound without video issues prove more often than not!
Methodically working from software resets through hardware diagnoses prevents wasting money over premature total TV replacements.
Many users actually experience lasting solutions simply reseating HDMI interfaces alone. While component failures down the road may necessitate surgical fixes as units age and degrade.
Just be sure to fully use built-in diagnostic modes and properly escalate to manufacturer authorized support before throwing in the towel. Specifically when dealing with higher priced Bravia models.
Here’s wishing you clear signals ahead! Let me know in the comments if these steps resolved your Sony TV sound and no picture problem.