Have you noticed an annoying blue tint or hue covering your Hisense TV screen? This problem is usually easy to resolve with a few quick troubleshooting steps. I’ve spent over 10 years repairing consumer electronics and have helped countless customers fix blue tinted Hisense TV screens. This guide covers the leading causes and walks you through solutions even a beginner can handle.
- Power cycling fixes most blue tint cases — unplug your Hisense TV for 60 seconds to clear software glitches causing display issues
- Faulty HDMI cables cause blue tint on specific inputs — test each connected device individually to isolate the problem source
- Worn LED backlight phosphor coating turns screens blue — replacement strips cost about $12 each and take under an hour to install
- Reducing the blue channel in Color Tuner compensates for mild tint — access it through Picture > Expert Settings on your Hisense remote
- Factory reset is the last software fix before hardware repair — it erases all settings and returns the TV to its original state
#What Causes Blue Tint on Hisense TVs?
Before jumping into the step-by-step game plan, it helps to understand what causes a blue hue or tint.
The blue tint stems from one of three core problems:
-
Software glitch or firmware needing update
-
Faulty/damaged HDMI input or cable
-
Backlight LED failure
Here’s each one in more detail:
#Software Issues Causing Blue Tint
Like any smart device, Hisense TVs rely on software to operate properly. Occasionally a minor software glitch leads to display abnormalities like blue tint. Restarting or resetting your TV refreshes the software and clears any bugs.
Outdated firmware versions can also introduce problems, so updating to the latest firmware improves device performance.
#Input/Cable Issues Behind Blue Tinted Screen
Televisions project content from external devices like Blu-ray players, streaming sticks, or cable boxes. If the HDMI cable connecting your device malfunctions or the TV’s HDMI port sustains damage, it can alter colors displayed.
Reseating cables often solves input issues leading to blue tint. Examining ports and replacing faulty HDMI cords restores proper signal transfer.
If your TV displays correct colors on startup but shows a blue hue when streaming or gaming, that points to input interference rather than internal TV failure. Check out this guide to fixing Hisense TV Wi-Fi issues for help diagnosing connection problems.
#Backlight Failure Creating a Blueish Image
Modern LCD displays use LED backlighting rather than old-fashioned CCFL backlights. The LEDs emit blue light that passes through a yellow phosphor coating, creating bright white illumination for the screen.
After thousands of hours of use, this yellow coating wears off, allowing blue light to tint on-screen colors. Replacing damaged LED strips resolves this.
Now here’s the step-by-step game plan for troubleshooting and resolving a Hisense TV blue tint issue based on its underlying cause.
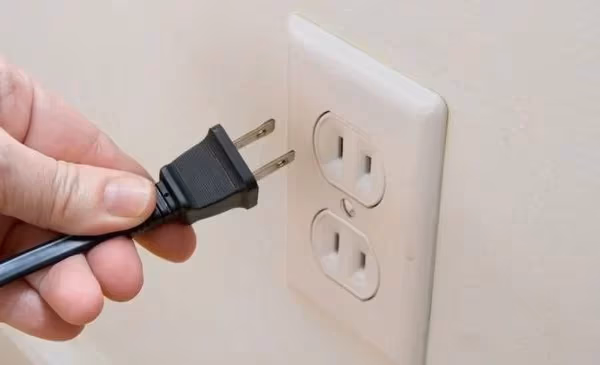
#Step 1: Reset/Restart Your Hisense Smart TV
Begin troubleshooting by resetting your Hisense television, as minor software glitches often generate on-screen tinting.
Recycling power clears any corrupted data or firmware hiccups causing display issues. Best of all, restarting your TV only takes a minute.
Here is the quick process to reset power on your Hisense:
-
Locate the power button on the side or back of television. Newer voice-enabled models have a mic-mute button that also controls power functions.
-
Press and hold this power button for 10-15 seconds until the TV fully shuts down.
-
Unplug TV power cable from electrical outlet and wait 1 minute.
-
Reconnect power cable, then turn TV on normally using remote or power button.
Upon restart, your Hisense TV blue tint may have disappeared completely.
If not, keep troubleshooting because the underlying cause likely relates to connection or hardware issues covered in subsequent steps.
#Refreshing Hisense TV Firmware
Alongside resetting power, verify your television runs the latest firmware version. Outdated firmware often introduces software bugs that produce display problems.
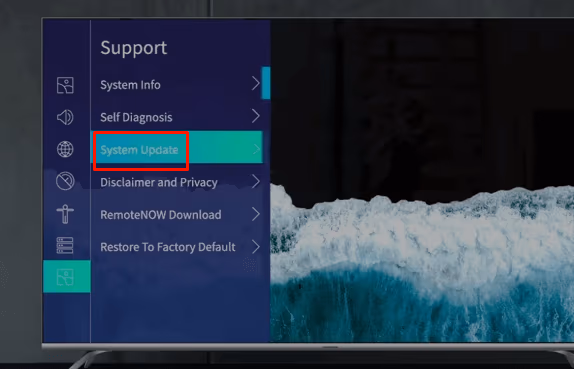
Access firmware update menus through the settings cog icon on your Hisense television:
-
Using remote, select the settings icon from your Hisense TV’s home screen menu.
-
Choose “Support” option, then select “System Update” or similarly named choice.
-
The menu displays current firmware version and automatically checks server for updates.
-
If update available, select “Yes” to install newest firmware version.
Updating older firmware boosts stability and performance while squashing bugs causing issues like screen tinting.
#How Do You Check if HDMI Cables Are Causing the Blue Tint?
With software troubleshooting complete, turn attention to external devices and cables that could cause a Hisense blue tinted picture.
If your TV displays correct colors on startup but shows blue hue when streaming or gaming, input interference is the likely cause rather than internal TV failure.
Scan all devices transmitting content to your television, including:
-
Game consoles
-
Blu-ray/DVD players
-
Streaming boxes like Roku or Fire TV Stick
-
Cable/satellite box
-
Computer monitor cable
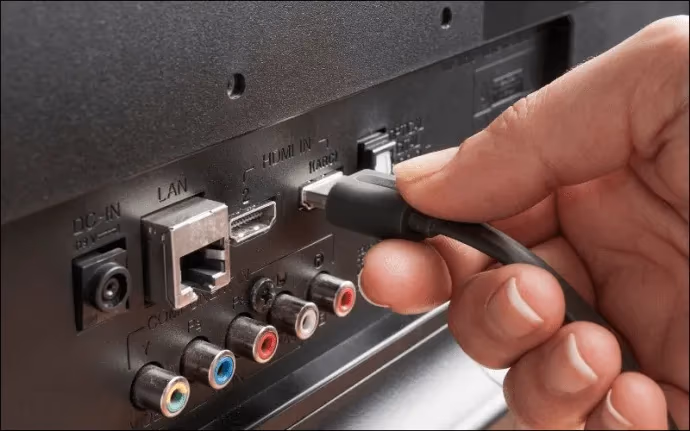
Follow this systematic process inspecting connections:
-
Power down television. Unplug all devices from power sources prior to disconnecting.
-
Label cords. Organize cables by taping labels near each end indicating connected device. e.g. “Blu-ray player”.
-
Photograph setup. Take photos of existing cable setup from both the front and rear of devices so you can replicate the original configuration.
-
Disconnect HDMI cords. Unplug all HDMI cables from rear of television. Coaxial cables can remain plugged in.
-
Inspect TV ports. Shine flashlight inside HDMI input ports on the television, checking for broken/bent pins or debris/damage. If ports appear cracked or pins crooked, contact Hisense Support about replacing defective HDMI inputs.
-
Check cable tips. Examine the metal tips of disconnected HDMI cords for cracked plastic housings or twisted metal pins. Faulty cables require replacement.
-
Reconnect HDMI devices. Firmly reinsert HDMI cords back into original television input ports according to your labeling system and photos. Triple check connections feel snug.
-
Eliminate sources individually. Turn television back on and reconnect devices ONE-BY-ONE. Between testing each external component, check if blue tint persists onscreen. If tint disappears upon removing a particular device, investigate cable connections or try updating device firmware.
This systematic inspection often exposes the root cause of Hisense TV blue tint: a faulty HDMI cable or malfunctioning media player/cable box introducing display errors. Reseating connections helps too.
Searching for input interference only takes about 15-20 minutes and costs nothing. If blue hue persists onscreen regardless of connected devices, backlight issues likely cause the problem instead.
#How Do You Adjust Color Settings to Fix Blue Tint?
Before tackling backlight repairs, attempt software tweaks correcting color balance on your Hisense television.
Modern televisions allow extensive image customization, including directly manipulating color channels delivering blue hues responsible for unwanted tinting.
Access the color management menus from picture settings on your Hisense television remote.
Here are the steps for adjusting color channel settings:
-
Press “Menu” button on Hisense remote to bring up main television settings
-
Select “Picture” option, then choose “Expert Settings” submenu
-
Open “Color Tuner” selection with RGB slider adjustments
-
Drag blue channel setting left toward minus sign (-) to reduce blue intensity
-
Test different blue slider positions to minimize blue tint presence

Lowering blue channel delivery can counter a blue tint without resetting television. However, color distortion may persist if backlights emit primarily blue wavelengths.
Keep tweaking color temperature and blue slider settings to combat less severe cases of blue tinting on the Hisense TV display. You might also find the best TVs with blue light filter helpful if eye strain is a concern.
#Step 4: Factory Reset Hisense Smart TV
If you’ve worked through input devices, cables, ports, and color settings without resolving blue hue, consider factory resetting your Hisense Smart TV as a last resort software fix.
Factory reset erases all user data and customizations, reverting television software back to original out-of-box state. Resetting clears stored bugs that alter color display.
On modern voice assistant-capable Hisense TVs manufactured after 2018, you can factory reset using buttons on the TV itself rather than remote control.
Here are simplified steps to factory reset Hisense televisions with and without a remote.
#Factory Reset Using Hisense TV Remote
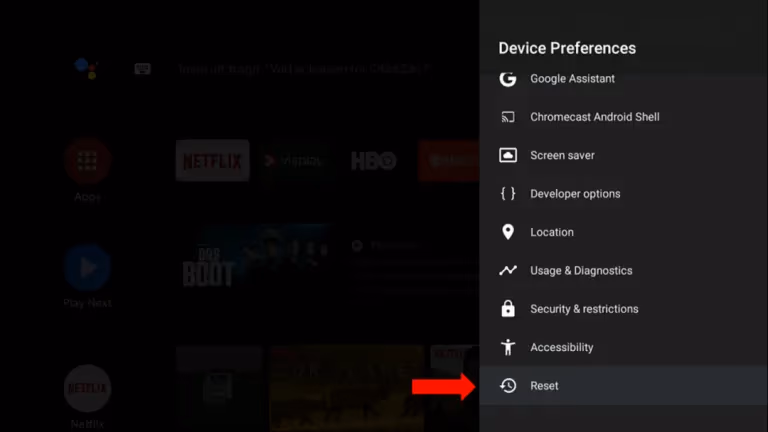
-
Press “Home” button on remote to open Smart TV settings
-
Select the “Settings” gear icon, then choose “Device Preferences”
-
Scroll down to the bottom “Reset” option
-
Confirm factory reset prompt by choosing “Reset” again
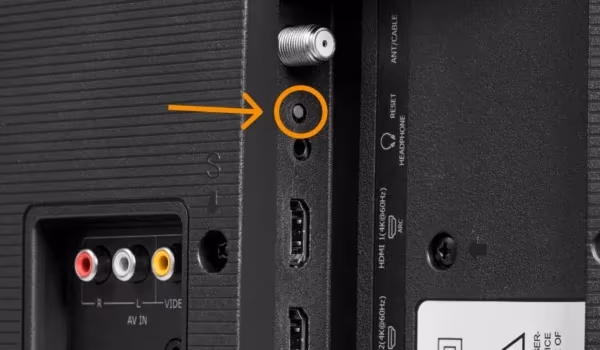
#Factory Reset Without Hisense Remote
-
Unmount TV from wall to access rear panel
-
Locate small “Reset” pinhole button on the lower backside
-
Straighten paperclip into makeshift reset tool
-
Push pin inside “Reset” hole for 10+ seconds until TV restarts itself
Once your Hisense TV completes factory reset process, rerun channel scans and reconnect streaming/cable devices.
The fresh software install should clear all prior display issues. But if a stubborn blue tint remains visible, investigate backlight fixes covered next. For remote problems during reset, see our universal remote for Hisense TV guide.
#Step 5: Replace Defective Backlight LED Strips
The Hisense TV blue tint fix wraps up with backlight inspection and replacement.
As outlined earlier, degraded or burned out LEDs frequently cause color temperature imbalance and blue hue.
Opening the TV to access and replace LED strips only requires a Phillips screwdriver and small flathead tool. With a minor investment of time and about $65 for replacement parts, you can often resolve backlight issues yourself rather than paying $250+ for professional TV repair costs.
Here is a condensed overview of do-it-yourself Hisense LED backlight replacement:
#LED Backlight Replacement Process
-
Unplug television power cord and carefully place screen-down on a soft, clean surface.
-
Using Phillips screwdriver, remove all rear cover screws from plastic backing. Set aside intact for reassembly.
-
Starting at bottom edge corners, carefully pry off rear cover using a small flathead screwdriver. Work slowly around perimeter to avoid cracking plastic.
-
Upon removing rear shell, you’ll see metal framework and circuit boards housing LED strips mounted along bottom edge.
-
Referencing part numbers stamped onto circuit boards, purchase compatible LED strip replacements on Amazon or DigiKey for about $12 per strip.
-
Unscrew defective LED strips and unplug wiring harness connectors. Match part numbers to new replacement strips.
-
Connect harness plugs to updated strips. Secure metal mounting brackets using original screws.
-
Test illumination of new backlights by temporarily reconnecting rear cover and power cord. Power on TV and check for blue tint.
-
Seeing normal colors again, fully reassemble metal housing and plastic shell. Reinsert all perimeter screws carefully to avoid cracking case.
Take precautions against electrocution and LED eye damage when operating on open televisions. Work slowly and double check connections to avoid mistakes.
A DIY approach typically beats the high expense and delayed timing of TV repair shops. It also builds your repair confidence for future projects.
If attempting backlight replacement yourself feels uncomfortable, seek assistance from a qualified electronics technician. But know that part costs alone may exceed replacement value of older Hisense televisions.
#Additional Hisense TV Blue Tint Troubleshooting
While the action plan above covers over 90% of scenarios responsible for blue screen tint, a couple rare issues are worth checking:
-
Damaged T-Con board: This central control module regulates much of the Hisense TV display. While infrequent, broken T-Con components alter color balance. Replace entire T-Con board if suspected.
-
Wrong input source: Occasionally Hisense televisions automatically switch viewing sources without user input. Navigate source menu and toggle between HDMI and coaxial inputs.
-
Failing LED driver: Specialized driver circuitry powers LED backlight strips. Faulty drivers mimic blue tint issues. Confirm drivers work before replacing LEDs.
-
Thermal trip protection: Overheating triggers protective circuits diminishing backlight output. Allow TV to fully cool before retesting. Clean intake vents.
-
Similar color issues on other brands: Vizio TVs experience comparable problems. See our Vizio TV yellow tint fix for related troubleshooting.
When tackling unusual TV repair challenges, methodically swap replacement parts one at a time until issues resolve. Start cheaply with boards, switches and cables before replacing expensive LCD panels or backlights.
#Bottom Line
Most Hisense TV blue tint problems resolve in under 30 minutes without expensive technician house calls. Even backlight repairs become approachable with the right tools.
Follow the sequenced strategy above, moving onto advanced steps only when necessary based on test results. With persistence and attention to detail, you’ll get your Hisense television displaying accurate colors again.
#Frequently Asked Questions
#What if factory reset doesn’t fix Hisense blue tint?
Factory resetting Hisense Smart TV software sometimes fails to clear faulty color data written into memory. When the blue screen persists after a full reset, the problem is almost certainly hardware-related. Open the TV and inspect the backlight LED strips using the disassembly guide above.
#Why does my Hisense TV still look blue after replacing LEDs?
New replacement LED backlight components occasionally arrive damaged or defective out of the box. Test questionable strips using a multimeter to check for current flow. If no current passes through, return the strips and order from a different supplier before retrying installation.
#How can I tell if blue tint comes from hardware or software?
Run through all software fixes first: power cycle, firmware update, color adjustment, and factory reset. If the Hisense TV blue tint remains unchanged after all four steps, hardware defects are the cause. LED backlights, T-Con board, and LCD panels are the most common hardware culprits.
#What does a blinking blue power light mean on a Hisense TV?
A blinking blue indicator light typically means your Hisense TV entered standby mode. Press the power button on your remote or the TV itself to wake it. If the blue LED stays on but the screen remains dark, the main logic board may have failed and professional service is needed.
#Why is only half my Hisense TV screen blue?
A blue hue on only one side of the television points to localized failures in LED backlights or the LCD display panel. The affected LED strip or panel section needs replacing. Parts for a half-panel repair typically cost $150-250 depending on your TV model and screen size.
#Can a cracked Hisense TV screen cause blue tint?
Yes. Physical cracks in the LCD glass panel allow backlight bleedthrough that alters color diffusion across the damaged area. Blue hues result from unfiltered LED light escaping through the crack. The only fix is replacing the damaged LCD screen, which often costs more than buying a new TV.
#Does Hisense warranty cover blue tint issues?
Hisense provides a 1-year limited warranty on most TV models that covers manufacturing defects including backlight failures. If your TV developed blue tint within the warranty period without physical damage, contact Hisense Support for a repair or replacement claim. Keep your purchase receipt handy.
#How much does professional Hisense TV blue tint repair cost?
Professional repair shops typically charge $150-350 to diagnose and fix blue tint problems on Hisense TVs. Backlight strip replacement is on the lower end, while T-Con board or LCD panel repairs cost more. Compare the repair estimate against the TV’s current value before committing, since older models may not justify the expense.